VPN
With VPN (Virtual Private Network) access, you can access university-restricted services outside the university data network, such as local intranet applications. The device using the VPN access is virtually integrated into the university network and thus receives all the rights of a computer in the local network.
In order to connect to the university's services via VPN, you need to install a VPN client on your device. We recommend the Cisco Secure Client. However, a connection via Cisco AnyConnect is still possible.
Overview
- When do I need VPN
- Requirements for VPN
- Technical description
- Instructions Cisco Secure Client
- Known problems and solutions
- VPN news
- Contact Us
When do I need VPN
VPN is required for:
- direct access to network drives (drives "J:", "M:" or similar) (instructions)
- Confluence Wiki
- Use of certain software products (especially with network licenses, e.g. Matlab, Maple, Mathematica, Origin, Mathcad, SPSS for employees)
- Sharepoint
You do not need VPN for:
- employees and students e-mail, both via mail clients and Webaccess (instructions)
- VIS:online and LFU:Online
- Intranet and Uniwiki
- our ticket system
- copying files from and to network drives (I:, J:) (instructions)
- OpenOlat
- library system
- electronic library databases and journals of the ULB
- basic browsing
Requirements for VPN
For VPN access you need:
- a functioning Internet access from any provider
- a user ID at the University of Innsbruck including the "data network access" service. The service is automatically activated for all students and employees of the University when the account is set up
- the installation of Cisco Secure Client on your computer.
We ask for a "fair use": use the VPN connection only as long as you use the protected applications of the university and then disconnect again. By doing so, you release the VPN connection for other users and enable us to save license costs and continue to offer the service in this form.
Technical description
When a VPN connection is established, a tunnel is created between your device and our Cisco VPN server.
After successful validation, your PC will be integrated into the university's data network. For this purpose, it is temporarily assigned a dynamic IP address of the University of Innsbruck.
In order to achieve increased security and to prevent a simultaneous break-in via your PC's "back door", your operating system will restrict your PC's direct communication to the VPN tunnel for the duration of the VPN session.
We recommend using the Cisco Secure Client, as it supports all major platforms.
Instructions Cisco Secure Client
In order to connect to the university's services via VPN, you need to install a VPN client on your device. A connection via the outdated Cisco AnyConnect is still possible, but we recommend updating to the new Cisco Secure Client.
Installation / Update
You can download the latest version of the Cisco Secure Client for Windows, macOS and Linux from the ZID download page. In order to access the site, it is necessary to sign in to the university login page . When using mobile devices, you can find the Cisco Secure Client / AnyConnect in the respective AppStore.
- Download the software on your device via the ZID download page.
- Execute the downloaded file. You will find it on your device (usually in the download folder). For Windows, the file name is e.g. cisco-secure-client-win-5.1.1.42-core-vpn-webdeploy-k9.msi.
- Follow the instructions of the Setup Wizard. The Cisco Secure Client has to be installed on the PC with admin rights.
- You can now use the Cisco Secure Client.
How to use
Important: to log in to the VPN service in the Cisco Secure Client, a VPN token is now required instead of your university password.
1. Open https://vpntoken.uibk.ac.at and log in to the university login page
2. Open the Cisco Secure Client on your device.

3. The first time you connect, enter the name of our server vpn.uibk.ac.at in the empty field. From the second time you connect, the name VPN University of Innsbruck will be displayed.
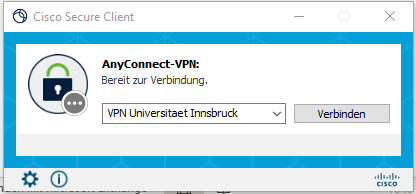
4. Click on Connect. A new window will open.
5. Refresh (with F5) the page https://vpntoken.uibk.ac.at and copy the token (one-time password).

6. Go back to the Cisco Secure Client and enter your university user ID in the Username field and the token you just copied in the Password field.
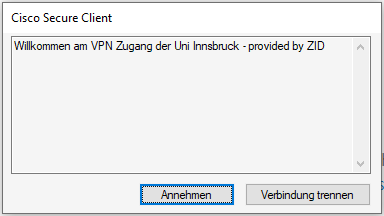
7. Click on OK. A new window opens.
8. Click on Accept. The connection is now setup.
For security reasons, after 5 failed attempts with the wrong password, access is generally blocked for a certain period of time. (Block_Brute_Force)
Disconnect Client
After a successful connection setup, you will see the Cisco Secure Client icon in the taskbar (ball with a lock).
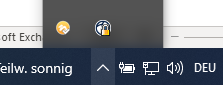
The closed lock next to the symbol indicates that the VPN connection has been successfully established.
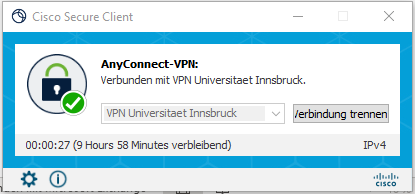
To terminate the connection, open the Cisco Secure Client and click on Disconnect.
In order not to unnecessarily use the valuable VPN licenses, we ask you to end the connection manually after your work.
Additional information
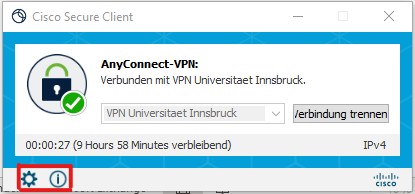
- Cogwheel icon: more information about the VPN connection; view and change settings.
- i symbol: Information about Cisco Secure Client, e.g. program version.
- After 30 minutes of inactivity (no packages are transmitted) and after 10 hours of maximum connection time (9 hours .... Remaining), the connection is automatically ended. You must then log in again.
VPN options
You can control the behavior of the vpn tunnel by adding options separated by _ to your user ID.
The following options are possible:
| Option | Meaning | Note |
| split | Split tunneling is activated. This means that only traffic to the university is sent to the VPN server via the VPN tunnel. The remaining traffic arrives at its destination without detour and unencrypted. |
|
| long | Increased (maximum) session timeout - two days instead of 10 hours |
Known problems and solutions
VPN Installation under macOS - Client already installed
During installation, it is claimed that the Cisco Secure Client is already installed.
The cause is a previous, invalid software removal by deleting the program folder.
Workaround: You can remove the still incorrect reference by executing the command sudo pkgutil --forget com.cisco.pkg.anyconnect.vpn
in the terminal.app.
VPN Installation under Linux - Installation problems
Due to problems with the rather complex installation of the Cisco Secure Client, we recommend the use of "OpenConnect" which is now included in almost all Linux distributions.
As VPN server please enter the address vpn.uibk.ac.at.
Zusätzliche Additional security products - Windows error messages appear when establishing a connection or during installation
Some security products such as Zone-Alarm, Avira, McAffee often cause problems.
The security software tries to examine web traffic as well and works in your system with a ManInTheMiddle attack to check HTTPS connections. These measures then prevent the VPN connection from being established.
Please uninstall these products on Windows 10 and upwards. Windows already offers good basic protection with "Virus and threat protection".
After establishing the connection, I can no longer access IP devices (e.g. printers) in my home network
Click on the cogwheel icon at the bottom of the Cisco Secure Client and activate the Allow local LAN access when using VPN (if configured) option in the Preferences tab.
Timeouts - The VPN connection is terminated
Idle Time Out - If NO packets are transmitted via the VPN tunnel, the connection is terminated after 30 minutes. You can find a packet counter in the Cisco Secure Client under statistics.
If necessary, start an application that regularly requests/consumes data.
Session Time Out - Sessions can exist for a maximum of 10 hours. The remaining time is displayed in the AnyConnect Client at the bottom in the GUI.
The limits are used to avoid using unnecessary resources, especially licenses.
For special cases, you can also use our VPN option long.
Web pages are no longer displayed in the browser after the VPN connection is established
An error message appears in the browser stating that you are not authorized to use the server. There is probably a proxy server configured by your provider in your web browser which you are no longer allowed to use after establishing a VPN connection with the university IP address assigned to you.
Workaround:
Deactivate the proxy server in the web browser. In Internet Explorer, you can find the setting under
Tools/Internet options/Connections/Your provider/Settings or
Tools/Internet Options/Connections/LAN Settings/Settings .
Do not activate the options "Use proxy server for this ...." as well as the two options under "Automatic configuration".
Connection is established; however, database cannot be used in the web browser
Check with your web browser whether you actually receive an IP address of the University of Innsbruck. To do this, visit the website http://checkip.dyndns.org/
Your browser should return an IP address from the VPN pool of the University of Innsbruck as "Current IP Address:". These addresses usually start with 138.232. The IP is assigned dynamically when the connection is established.
If you are shown a completely different address, there is something wrong with your routing settings on your PC, or you have configured an incorrect proxy server in your browser. The data packets then do not travel via the VPN connection to the University, but via a different channel, which causes the database provider to reject your request for lack of authorization.
Create a DART (Diagnostic and Reporting Tool) file
If all attempts to solve the problem fail, you can send us a DART file.
To create the file, proceed as follows:
- Download the appropriate DART software from the ZID download page and install it.
- In the Cisco Secure Client, click on the settings icon (wheel at the bottom) and then select “Diagnostics”.
Save the file created during diagnostics to your desktop and then send it to innet-admin@uibk.ac...
Chrome reports "not secure" when downloading the software.
The software has been tested by the ZID and can be used without hesitation
Why is the log in to VPN with 2FA so complicated?
Unfortunately, usability and security are often opposites.
The introduction of two-factor authentication, especially for external network access via VPN, has been planned for some time and is absolutely necessary in the current IT security environment.
Entering two factors naturally always means additional work. The procedure we have specifically chosen for VPN is primarily due to our decision to offer continuity in the VPN product and at the same time to be able to support several procedures (TOTP, Webauthn ...) in the 2FA procedures.
The procedure takes some getting used to. Nevertheless, we are working on making the process as simple as possible.
VPN works via mobile hotspot – the VPN server cannot be reached when connected via Wi-Fi/LAN
Send this to innet-admin@uibk.ac.at with a brief description of the error.
VPN news
- October 21, 2024:
We recommend everyone to update the Cisco Secure Client to the latest version of the VPN software. - March 4, 2024:
As part of the process of increasing IT security, the university's services are gradually being equipped with two-factor authentication.
For VPN access, this means a two-step login process using a VPN token that you first receive on the https://vpntoken.uibk.ac.at page and then enter as a password in the Cisco Client.
Transition phase: Until March 31, 2024, you can instead still use your password in the Client. - March 1, 2024:
We recommend everyone to update AnyConnect to the current version of the VPN software Cisco Secure Client. - October 23, 2023:
New VPN hardware put into operation. This software no longer offers web VPN and requires AnyConnect >=4.0, which also means that support for Windows7 32bit is no longer available.
Please report problems to innet-admin@uibk.a. - June 18, 2023: Block_Brute_Force:
For security reasons, after 5 failed attempts with the wrong password, access is generally blocked for a certain period of time (after the last failed attempt).
Contact Us
Please send your requests to the ZID Service Desk at ZID-Service@uibk.ac.at or from Mon. - Fri. 08:00 - 16:00 at +43 512 507 23999.