Sync & Share (Fileshare)
For enquiries or feedback, please contact zid-service@uibk.ac.at.
Frequently asked questions are answered at FAQs on the use of Fileshare (german version).
Fileshare is a Sync&Share application based on the Seafile software. It offers the possibility to share files within the university as well as with external persons, to keep them easily accessible on different systems and to edit them collaboratively.
Fileshare offers a web interface to easily manage and share files with others. In addition, there are two desktop clients that synchronise folders from the web interface with the PC. Fileshare can also be accessed via a smartphone app.
Students have 20GB and employees 100GB at their disposal.
Getting started - using the web interface
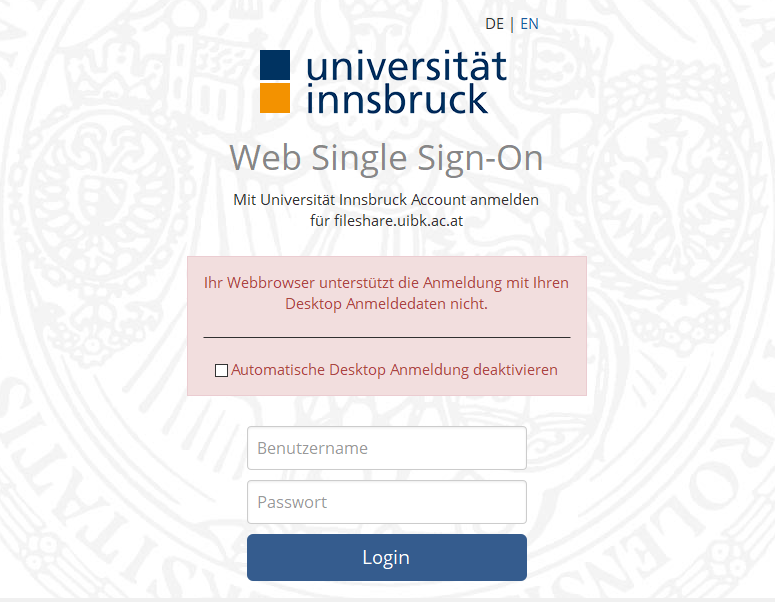
The web interface can be accessed here: https://fileshare.uibk.ac.at You will see this in your browser when you first log in:
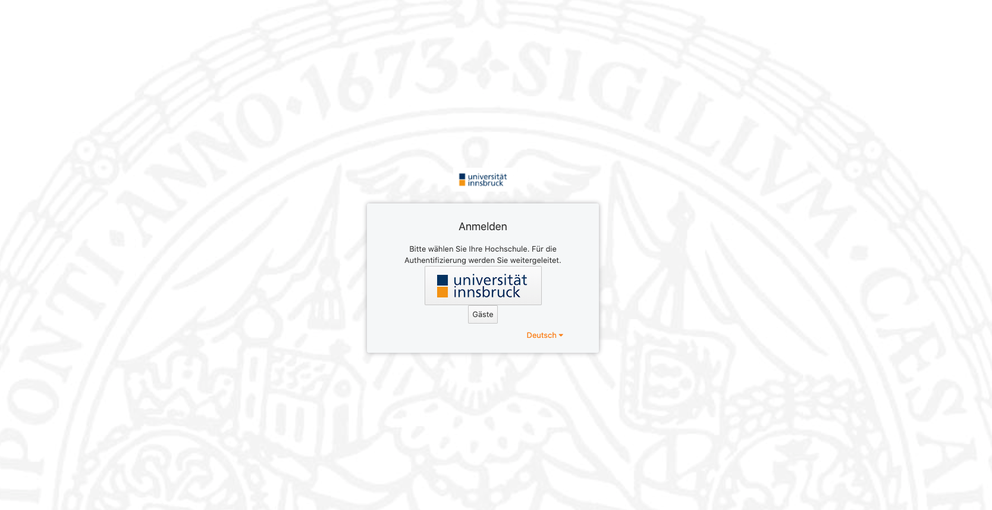
Click on the large logo of the University of Innsbruck and log in with your personal accounton the login page that appears . You will now be redirected to the Fileshare web interface.
You are now on the start page:
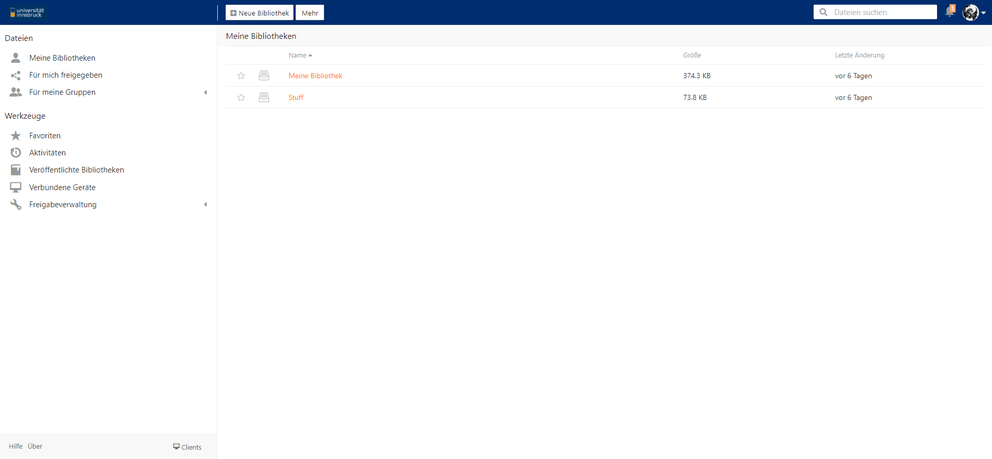
File management with libraries
Fileshare uses so-called "libraries" to organise your files. A library is a container for a series of files and folders. You can create a library for each project you are working on or for each type of document you want to save in Fileshare. A library works in a similar way to a folder. However, it also has some special properties:
- Each library has its own file change history. There is no global file change history for all libraries.
- Each library can be synchronised separately with desktop clients. You can choose which libraries are to be synchronised.
When you log in to the Fileshare web interface for the first time, Fileshare automatically creates a default library called "My Library" for you. You can also create additional libraries.
You can navigate in a library and manage your files and folders. You can upload, download, rename, move, copy and delete files.
Restore deleted files and folders
Each library in Fileshare tracks your file deletion operations automatically. Sometimes it can happen that files are deleted by mistake. You can find your deleted files in the recycle bin of each library.
How to use the recycle bin:
- In the web interface, navigate to the parent folder that contains the deleted file or folder.
- Click on the "Recycle bin" icon in the library operation bar. The deleted files and folders are listed in the order in which they were deleted. At the bottom of the list, you can click on the "More" button to display more deleted files.
- You can restore files and folders in the list of deleted files. If the parent folder of a file or folder has been deleted, it will be restored to the root folder of the library.
- Please note that the bin only contains files and subfolders that have been deleted under the current folder. Files that have been deleted in the subfolders of the current folder are also included in the list.
Find older versions of files
Fileshare keeps track of the change history of all files. Whenever a file is changed, a new version is created while the old version is kept.
To list all versions of a file:
- In the web interface, navigate to the folder that contains the file. Move the cursor to the line of this file. An operation menu appears. In this menu, you can click on the "Versions" button.
- A list of all versions of this file is displayed in chronological order, from newer to older.
- You can download, restore and display each version of the file. For text files, you can also compare the content of two versions.
Clients
Fileshare offers several ways to link its data from the web interface directly to an operating system or smartphone. This leads to a better integration of Fileshare into everyday working life. The three different options are described below.
Clients for all operating systems can be downloaded from the official Seafile website (https://www.seafile.com/en/download/):

Desktop Syncing Clients
The installation is described below using the Windows client as an example.
- Download and open the "Client for Windows".
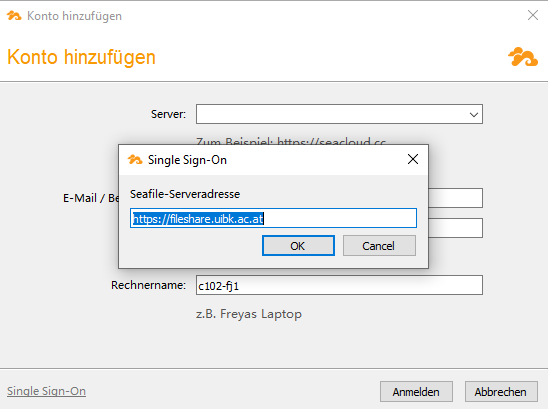
- Do not fill in the fields, but click directly on "Single Sign-On" at the bottom left when logging in.
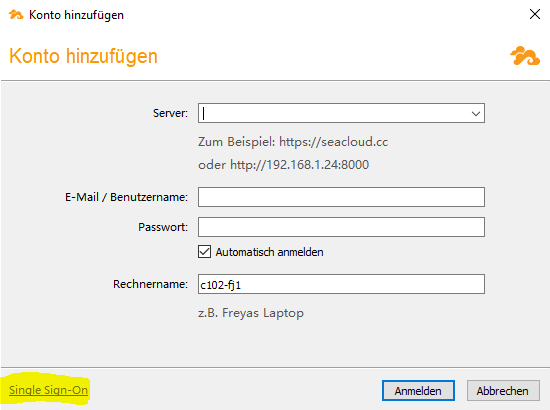
- Enter https://fileshare.uibk.ac.at as the server and enter the login details when forwarding.
- Installation completed. Fileshare now synchronises the data directly.
Synchronising a library
Existing libraries on the Fileshare server can be synchronised with an existing folder on your computer. The local folder must have the same name as the library. The files in the local folder are merged with the files in the library. No file in the local folder or in the library will be overwritten or lost. Merging leads to some conflict files if the file contents in the local folder and in the library are different.
To synchronise a library with an existing folder, right-click on the library in the main window of the Fileshare client and click on "Download and synchronise".
Selective synchronisation of subfolders
You may have some very large libraries on the fileshare server and you are currently only interested in a subfolder within a library. You can selectively synchronise a subfolder in a library instead of synchronising the entire library.
To synchronise a subfolder, open the Seafile file browser by double-clicking on a library that has not yet been synchronised. Navigate to the parent folder of this subfolder. Right-click on the subfolder. Select " Download and synchronise " in the pop-up menu.
Setting the synchronisation interval
Normally, the fileshare client automatically recognises changes to the local folder and uploads the changes to the server. However, if the local folder is located on a Windows network drive, the fileshare client cannot reliably recognise changes. In this case, you can set the fileshare client to regularly check for changes in the local folder. You can set the interval for this periodic synchronisation. The interval is set in seconds.
Seadrive client
The Seadrive client allows you to access files on the server without synchronising with the local hard drive. It works like a network drive. The installation process is similar to the installation of the desktop client, which is why we will not go into further detail here.
After successfully logging on to the server, the Seadrive client starts retrieving the library and file list from the server. You can leave it running in the background and will be notified when the retrieval is complete.
The virtual drive folder will now open. You will notice that it works just like an ordinary hard drive on your computer. The top-level folders in the virtual drive are libraries on the Seafile server. The file content is downloaded when you open a file. Recently opened files are cached on your local hard drive. All cached files are marked with a green tick.
Smartphone apps

The Seafile Pro mobile apps for Android and iOS are the convenient way to access files in your own and shared libraries from your smartphone and tablet. The iOS app can be downloaded from the Apple App Store and the Android app from the Google Play Store.
The mobile apps allow "on-demand" access to the data on the Seafile server. Files are downloaded from the server the first time they are accessed and displayed on the mobile device. Once downloaded, files are then cached on the device for possible future use. It is also possible to download an entire library.
Any type of file can be manually uploaded from the mobile device to a library. For photos and videos, the apps offer an automatic upload function that can be activated and configured in the settings.
When you start the mobile app for the first time, you will be asked to add a new account. Click on Add account and select Other server in the menu that opens.
Now click on "Single Sign-On" and enter the server address https://fileshare.uibk.ac.at.
After logging in once, you are now connected to your Fileshare account.
Working together
Sharing files and folders
In Fileshare there are several ways to share files and folders with others:
- Using links: There are several types of links that can be used for sharing to different areas of collaborators.
- Sharing links: Any user who has access to the links can access the files or folders that the link points to. No login is required.
- Upload links: Any user who has access to the links can upload files to the folder that the link points to. No login is required.
- Internal links: Only logged-in users who have sharing permissions for files or folders can access this link. Used for internal file sharing.
- Library or folder sharing: Used to set access permissions to a library or folder for specific users or groups. Users must log in to access the folders.
Create download link to files or folders
Download links are public links to files or folders. They are accessible to everyone, even those who do not have a Fileshare account. You can also use a password and an expiry time to protect your links.
You can also set access permissions for sharing links. There are three types of permissions:
- Preview and Download: The file or files in the folder can be downloaded. If the file type can be previewed in the web browser, the files can also be viewed online (e.g. Office files).
- Only preview allowed: The file(s) in the folder can only be viewed in the web browser, but cannot be downloaded. This is useful for sharing confidential data. For Office files, the file preview can also be provided with a watermark. The watermark contains the name of the link owner.
How to create a download link in the web interface:
- Navigate to the parent folder that contains the file or folder. Move the mouse over the file or folder and click on the "Share" icon.
- A pop-up window appears with all the sharing options. Click on the "Download link" tab on the left-hand side. Then click on the "Create" button to create a link. You can use password, expiration time and permission to protect your link.
- Copy the link to an email, instant messaging client or other tool to send it to others.
Create upload links to folders
You can use upload links to collect files from others. However, you can only create upload links for one folder. Others cannot see the files in the folder. You can only upload files to the link.
How to create an upload link in the web interface:
- Navigate to the parent folder that contains the folder. Move the mouse over the folder and click on the "Share" icon that appears.
- A pop-up window appears with all sharing options. Click on the "Upload link" tab in the left-hand panel. You can protect your link with a password.
- Copy the link to an email, instant messaging client or other tool to send it to others.
Sharing libraries or folders
You can share a library or folder with other users. The shared library or folder can be accessed by other users.
You can select the scope of the sharing:
- Share with user: You can share with one or more users, one at a time.
- Share with group: You can share with one or more groups
You can also specify the authorisation for sharing:
- Read/write sharing: the sharing members can perform all update operations on the folder, including update file, upload file, delete, rename.
- Read-only share: The share members can only read the folder and the files it contains. They cannot update the folder or the files.
- Online read and write: Users can view and edit the file online via a web browser. The file cannot be downloaded.
- Online read only: Users can view the file online via a web browser. File cannot be downloaded.
To share a library or folder with a user or group:
- Hover your mouse over the library or folder and click on the "Share" icon that appears.
- A pop-up window appears with all the sharing options. Click on the "Share with user" or "Share with group" tab on the left-hand side. Enter the user or group name for which you want to share. Then click on "Send".
- Once you have shared a folder or library with a user, the user can view it by clicking on the "Shared with me" tab in the left-hand pane of the web interface.
Internal links
Only logged-in users who have sharing authorisations for files or folders can access this link. It is used for internal file sharing. It is a convenient way to share files between team members who have access to a shared library. You can simply copy the link and paste it into an email or other messenger.
Send/receive files as a link instead of an email attachment:
In principle, sending email attachments is not recommended if:
- the attachment is too large for emails
- or are filtered out by our SPAM and virus filter for security reasons
- you do not want to skip the mailbox of your communication partner
In this case, the file should be integrated into the email text as a link.
Manage groups
Creating a group is a convenient way to share files with many people. In Fileshare, you can easily create and manage a group.
This is how groups work in Fileshare:
- Each group has a group administrator. By default, the owner is the creator of the group. The owner can add further group administrators. They can also transfer ownership of the group to another member.
- The owner (and the group administrator) can add/delete members in the group. They can also share a library in the group.
- Content added to a group is only charged to the quota (storage) of the group owner.
To see all the groups you are in, click on the "For my groups" tab on the left-hand side. You will then see all the groups you are in. If you click in a group, you will see the libraries shared in this group.
To create a new group, click on the "For my groups" tab on the left-hand side of the window. Then click on "My groups". On the "My groups" page, you can click on the "New group" button to create a group.